
If you’re reading this, it is most probably because I referred you here. The important thing, however, is we’re here to learn something new, or at most, upgrade your knowledge, or if you’ve done this before, provide me some useful critique. We’ll be discussing how I built a Morse Code generator.
This blog will mainly feature my work with developer electronics and most forms of computing. As most of you know, I’m currently doing BE in Mechatronics at MIT, Manipal. People would generally expect me to incline more toward the mechanical side of the branch, but conformity is just not my way. I have displayed an exceptional interest in Electronics and Electricals as well as Communication – electronic communication, mind you; I do seem to have trouble in real life communication. Having said that, let us get to what I’m going to discuss here as of now – my work with electronics.
.._.
‘Microcontrollers’ was a theory chapter in Computer Science when I was in junior college, yet I hadn’t seen one until the end of my first year at MIT. Learning microcontrollers was not a big deal; the big deal is writing a microcontroller program on your own without help(and I don’t mean programs that find result after subtraction using 2s complement). Tens of my colleagues have made robots using microcontrollers but only because they were parts of guided tours. They hadn’t much to do with the robots they owned. I don’t mean to be rude here but ask yourselves this, “Am I capable of writing programs for the chip and incorporate it in a different bot?” Well, I am. Now, this is not the first thing I’ve ever made; it is only the first thing I have shared for everyone to see.
.._
First of all, you need to know my motivation for this project, so here goes. MIT had offered to take classes for people wanting to own Amateur Radio licenses. This seems like a great opportunity to be one amongst about half a million around the world with special privileges. These people are actually hobbyists and follow a certain convention – one of them being, you guessed it, Morse Code communication. And so, people who wish to apply for the general license need to know Morse Code.
_._.
As I see it, Morse Code is not that difficult to learn; what is difficult, however, is that after five minutes of practising people get exasperated and tend to stop. It is not the fault of anyone actually; people do get tired when all they hear is one tone played over and over with differences in duration of the tone and the pause. So, I decided to get a Morse code tutor that would reward me everytime I recognised a letter correctly. The only way I could do it, without paying anyone, is by setting up one of my microcontroller boards such that it gives me a randomly chosen code anytime and I type in the letter. It is funny how I thought of something complex before the simpler alternative, and this is how I came up with the idea of the Morse code generator.
_._
Let us familiarise ourselves with the concept of Morse Code, shall we?

Particulars of Morse Code communication:
1. Basic time unit: This is the duration of the shortest pulse in a Morse code transmission, i.e. duration of the sound of the ‘dot’. This is what decides the speed and universality of your code. How universality? Well, we do have slow readers in this world, so, even though you’re following a convention you’re making it difficult for others to follow if you’re too fast with your Morse coding.
2. Duration of a ‘dash’: This has been set to be equal to the duraton of three dots.
3. Duration of intraletter spacings: This is the time of silence(or relaxation time) between two consecutive pulses within a letter; it has to equal to the duration of a ‘dot’. (If you see the picture above, the spaces between dots and dashes are as much as a dot.)
4. Spacings between letters in a word: This should be equal to duration of three dots, kind of like a ‘dash of silence’.
5. Spacings between words: This is a bit ambiguous. Generally it is defined as 7 dots, but people, who have reached a peak in their transmission speeds, use 6 dots(or 2 dashes).
6. Nomenclature of the pulses based on sounds: The dots and dashes in Morse code have been named onomatopoeically to make it easier to learn by letting you speak the sounds out.
- A ‘dot’ has to sound like “dit”.
- A ‘dash’ has to sound like “dah”.
- A ‘dot’, that is not the last dot in the sequence alloted to a letter, has to sound like “di”.
e.g. The letter ‘S’ in Morse code sounds like di-di-dit and ‘Q’ sounds like dah-dah-di-dah.
When you practice sounding the dots and dashes follow a fixed convention. As below,
_._ _ _ _ _ .._
dah-di-dah-dah dah-dah-dah di-di-dah
Morse Code circuit
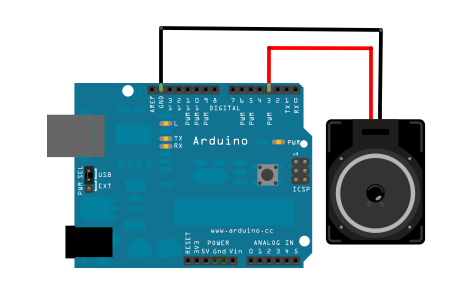
Things I’ve used in the making of the circuit:
- An Arduino board(any Arduino board will do; I chose Uno, because it was ‘the one’ for me, literally) and the Arduino software.
- A speaker(or a piezo).
- Connecting wires.
- A USB cable – male A to male B(for programming the Arduino and it’s serial communication with the PC).
- Lots of patience.
Some of you already know this; Arduino is one of the best platforms for learning and implementing developer electronics for the following reasons:
- It is open source; the hardware bound by Creative Commons licenses, much like the contents of this blog, and programming environment by GPL. This would mean that any derivative work you publish should atleast mention the original equipment; other than that, you’re free to use it howsoever you’d want to.
- The programming environment is user friendly and the language for programming is similar to the C language. This makes it easy for people with no prior knowledge of microcontrollers to self learn this piece of awesomeness.
- Engineers and hobbyists have already implemented a multitude of cool projects and put ’em all up online(yes, there are good people in the world). This means that you need not learn everything from scratch. Many have already done the hard work of implementing things you’ve thought of. So, you could pick up a project you found online and implement your own version of it with minor improvements.
- Many Arduino projects have standard hardware requirements whick means it is possible to make PCBs with certain fixed part on it and still make it run different programs. These standard boards called Shields(since they shield the main-board), can easily be attached and detached from the board to allow rapid-prototyping.
Back to the project now. We start programming here…

Programming
You can assign it some arbitrary value, thus making changes by trial and error, or make it read an environment variable to decide the duration in realtime. To assign it a fixed value the syntax is… first, we need to define the duration of a dot.
https://gist.github.com/6250863
which sets the duration of a dot to 100 milliseconds. In my project I made it read realtime analog signal from a potentiometer connected at analog pin 2…
https://gist.github.com/6252026
Now, let us define dash length, relaxation time, letter space time and word space time. A good way to do this is individually define them by multiplying the right values to the value of dotPeriod defined. My way, the elegant way, is to define them as multiples of dotPeriod itself…
https://gist.github.com/6252068
It seems the definitions are way off, aren’t they? But, you’ll see later why everything will fall in place…
So let us set the frequency and the tone pin…
https://gist.github.com/6252090
Now, if you’re me you’ll swap the buzz definition with the following…
https://gist.github.com/6252106
I added 200 to the analog input because it sets a lower limit of 200Hz instead of 0Hz; this way it can take an upper limit of 1223Hz…
Here is something I like to do a lot – making stuff modular. Even though the code gets a bit longer this way, it is a good thing to make a program you’ll understand like a decade from now.
So we get to defining what we call dits and dahs…
https://gist.github.com/6252126
Define dahs the same way; just change the delay to dashPeriod.
https://gist.github.com/6252138
Now, this is absolutely unnecessary, but you can define a function called di to make it more appealing.
https://gist.github.com/6252215
Now, let us define a function that makes it play the right letter in Morse code…
https://gist.github.com/6252264
As seen above, I’ve not gone alphabetically to reduce compute load. The letter E is the most frequent letter, so we first check for E, and then T and then A and so on. You could look up Morse code for various special characters and add them to the function as well…
Now let us define the mandatory setup function.
https://gist.github.com/6252278
Let us now define some global scope variables.
https://gist.github.com/6252288
Now let us define loop function. This one is also mandatory for an Arduino sketch to run…
https://gist.github.com/6252297
Now, lets understand what the code does. Steps as follows:
- It initialises the serial rate and sets tone pin as output.
- Waits for serial data.
- When the serial data becomes available, it grabs the data and stores them in an array; it also prints out the data as it enters and changes letters to uppercase. I’ve discussed this in my Computer Jerk blogpost of ASCII usernames.
- It plays the data, one letter at a time. The intraletter spacings are embedded in the dit and dah function itself. Spacing between letters are called after playing of the specific letter(space of 2 for letter and 1 for intraletter, giving 3 dot spaces. Word space is also defined in the letter playing function(4 for word space adds to 3 for the letterspaces, to give 7 spaces as intended).
- After all this is done, it goes back to step 3.
I cannot share the source code with you all, because it defeats the purpose of innovation. The code samples above are not directly from my code, so, you’re on your own if you wish to use this idea for your projects. I’m not the first one to make such a thing and there already have been people who made better ones; I still like mine better because I made it on my own…
Some things to try:
- The tone labeled ‘Special‘ in Nokia phones is actually Morse code for “SMS SMS“.
- The tone labeled ‘Ascending‘ spelles out “Connecting people“.
- The tone called ‘Standard‘ is just “M M” which probably is an initial for ‘message’.
- A very standard signal for help is SOS that sounds di-di-dit dah-dah-dah di-di-dit.
- Try using an audio jack instead of a speaker, analyse the audio and interpret the message, for example the piece below shows a message I recorded in Audacity.

The fun thing about taking up projects like this is to, at the very least, test your potential. Copy pasting gets you a lot initially but it is not respected by people except corporates(Hmmm!).
_ _
Of course, the occasional looking up information is allowed, since most of us, including me, are hobbyists; but believe me, engineering is fun only when you do it yourself…
You need not get back here as I’ll be alerting blog posts on my Facebook page RevRYL, and if you’re my friend on Facebook, it’ll appear in my status. You could also subscribe to this blog if you wish. I promise there’ll be more interesting stuff coming soon.
_
I’ll also be taking suggestions, for further project developments. Tutorials could be seen here on request, or you could ask for my personal advise on projects. Either way, I’ll be there…
